Linenbacking Attempt #4
Greetings,
I've been away for a bit due to health issues but for those following, I thought I'd pick up where I left off.
Instead of one long thread describing my linenbacking path, I thought I'd try to share what I've learned by describing my attempts on a poster to poster basis.
For those asking me about washing, deacidifying, bleaching and final rinse, I see Charlie described the steps in another thread. As I've mentioned, most, if not all of the information you need is on this site. You just need to do a little digging to find it.
That said, I just bought another damaged one-sheet I'll restore. I'll try to provide more detail abut the process when I get around to mounting it on the canvas duct (AKA: Linen).
For now, I'll describe what I ran into with Poster #4.
You'll see, at this point, I've not perfected my bleaching technique. As Charlie and Eisenhower mention repeatedly, there really is no substitute for experience. I highly recommend buying some of the $1.00 posters on eBay and jump in.
Anyway, at this point I pretty much figured out how to mount posters without wrinkles or air pockets. For this one, I'm still using the "Mylar Sandwich" technique for cleaning, rinsing, bleaching and final rinse. Upon completion of this process, I flatten the poster on a Mylar sheet, work out the wrinkles and air pockets with a squeegee (brayers don't work well for me) and roll the poster onto the canvas from the Mylar (NOTE: The canvas has Masa or Mulberry and wheat paste already applied).
I usually end up with very small air pockets. To remove the remaining air pockets, I place a clean Mylar sheet on top of the poster and using a squeegee, I push the remaining air pockets and/ or wrinkles out to the sides of the poster.
I completed three or four other posters using this technique until I started running into excess paste issues. Excess paste tended to flow through small rips and tears and onto the poster surface making the excess paste difficult to remove without affecting the ink/ image. I'll describe how I addressed this by modifying my mounting technique in another thread.
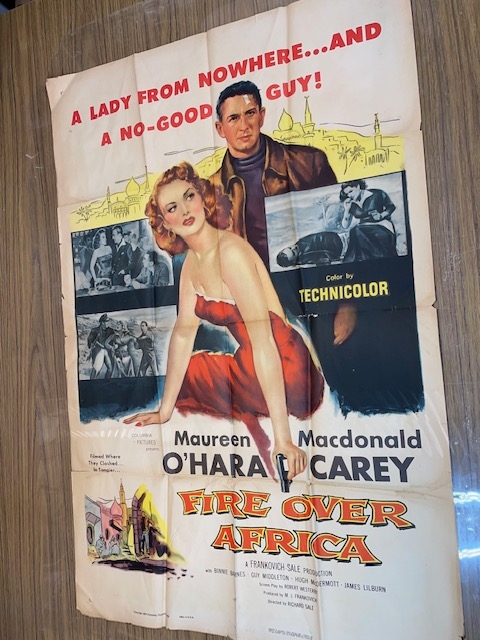
For now, the first picture is the "Before" shot. The second picture is the unrestored "After" shot. As mentioned, I did not have the right bleaching technique perfected but I'm well down the road to ensuring posters are mounted flat onto the canvas.
Before:

After:

I've been away for a bit due to health issues but for those following, I thought I'd pick up where I left off.
Instead of one long thread describing my linenbacking path, I thought I'd try to share what I've learned by describing my attempts on a poster to poster basis.
For those asking me about washing, deacidifying, bleaching and final rinse, I see Charlie described the steps in another thread. As I've mentioned, most, if not all of the information you need is on this site. You just need to do a little digging to find it.
That said, I just bought another damaged one-sheet I'll restore. I'll try to provide more detail abut the process when I get around to mounting it on the canvas duct (AKA: Linen).
For now, I'll describe what I ran into with Poster #4.
You'll see, at this point, I've not perfected my bleaching technique. As Charlie and Eisenhower mention repeatedly, there really is no substitute for experience. I highly recommend buying some of the $1.00 posters on eBay and jump in.
Anyway, at this point I pretty much figured out how to mount posters without wrinkles or air pockets. For this one, I'm still using the "Mylar Sandwich" technique for cleaning, rinsing, bleaching and final rinse. Upon completion of this process, I flatten the poster on a Mylar sheet, work out the wrinkles and air pockets with a squeegee (brayers don't work well for me) and roll the poster onto the canvas from the Mylar (NOTE: The canvas has Masa or Mulberry and wheat paste already applied).
I usually end up with very small air pockets. To remove the remaining air pockets, I place a clean Mylar sheet on top of the poster and using a squeegee, I push the remaining air pockets and/ or wrinkles out to the sides of the poster.
I completed three or four other posters using this technique until I started running into excess paste issues. Excess paste tended to flow through small rips and tears and onto the poster surface making the excess paste difficult to remove without affecting the ink/ image. I'll describe how I addressed this by modifying my mounting technique in another thread.
For now, the first picture is the "Before" shot. The second picture is the unrestored "After" shot. As mentioned, I did not have the right bleaching technique perfected but I'm well down the road to ensuring posters are mounted flat onto the canvas.
Before:

After:

1


